
The Deskera Payroll Management is broadly divided into five main sub-sections:
- Manage Components
- Generate Payroll
- Authorize Payroll
- Process Payroll – Trail
- Process Payroll – Final
The Following are the steps showing how to perform each action in Deskera Payroll Management.
Prerequisites:
- You have your Deskera HRMS application URL in place.
- You are the administrator of the HRMS application.
- Ensure Stable Internet Connectivity.
Manage Components:
Step 1: Click on Payroll Components on HRMS Dashboard under the Payroll module.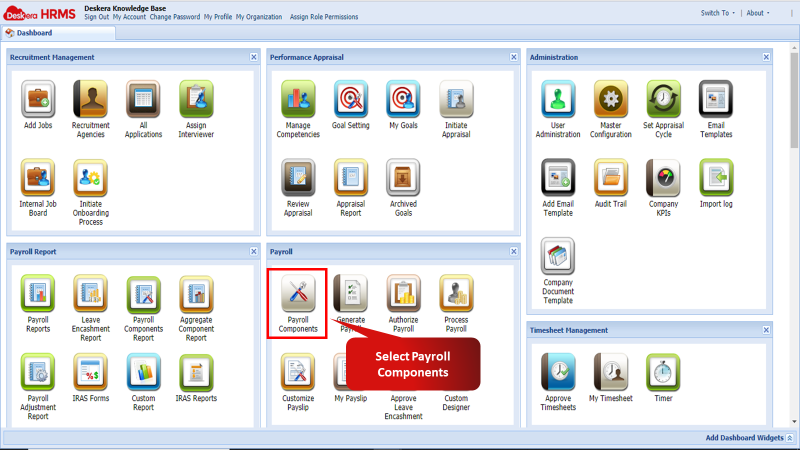 Fig 2.4.1 Payroll Components
Add Payroll Component
Step 1: To add a single Payroll Component, click on the Add New icon under the Components window.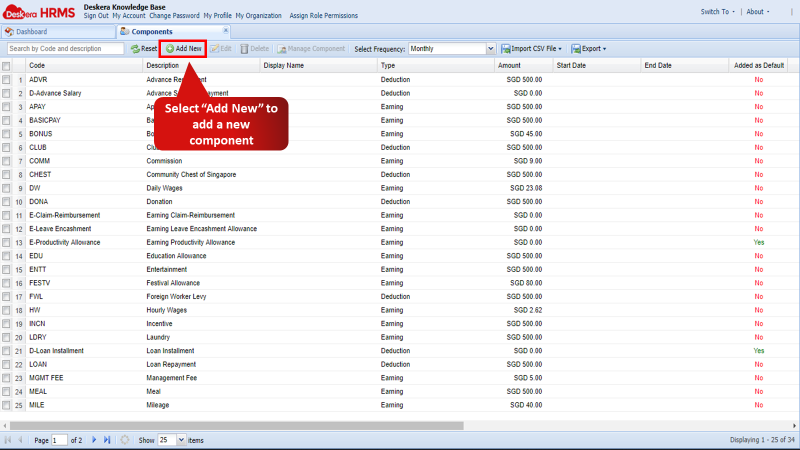 Fig 2.4.2 Add New Component
Step 2: The Add Component screen will appear. It will go through three settings. The first will be the Basic Settings wherein the user has to fill in details under Basic Components Settings and Component Optional Settings such as:
- Component’s Code to uniquely identify the component
- Component’s Description
- Display Name in Payslip
- Method through which the component will be calculated such as the direct Amount, as a Percent, through a specified formula or through Add rule to put conditions on the component’s calculation.
- Start Date and End Date for computing the component
- Type of the component, whether it is Employer Contribution, Earning, Deduction, Tax or Additional Remuneration.
- The frequency of the component.
- Click on next to proceed to the next screen.
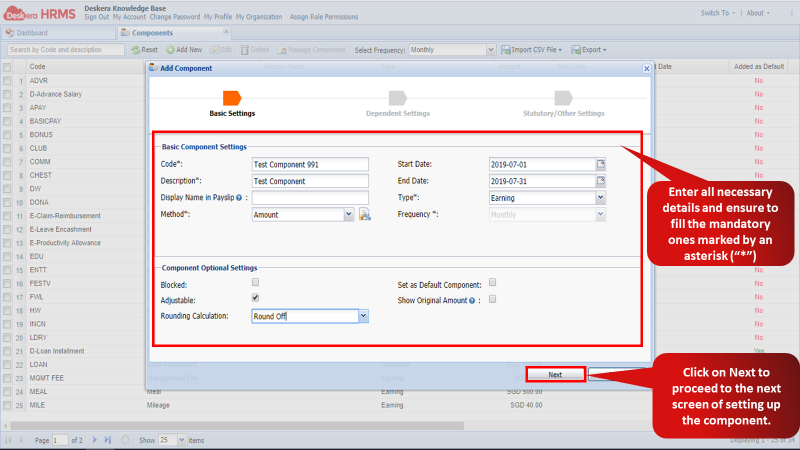 Fig 2.4.3 Basic Settings
Step 3: Under the Dependent Settings screen, the user can configure the configure the component based on parameters such as:
- LWP Applicable: Enabling this makes the component applicable for Leave Without Pay.
- Taxable: Enabling this makes the component applicable for tax.
- Undertime Applicable: Enabling this makes the component applicable for Undertime penalty.
- Proration Applicable: Enabling this makes the component applicable for Proration.
- Middle Month Changes: This setting needs to be enabled to carry out Auto Salary change flow.
- Annual Proration: Enabling this makes the component an annually prorated bonus component.
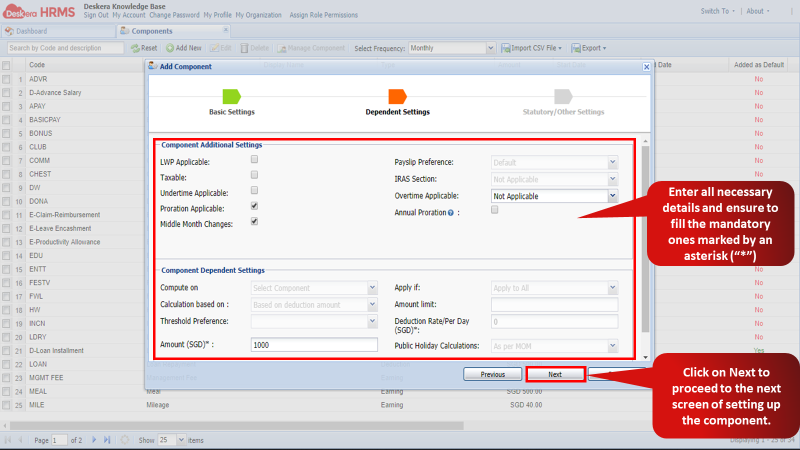 Fig 2.4.4 Dependent Settings
Step 4: Under the Statutory/Other Settings screen, the user can configure the component based on parameters such as:
- Wage Type: If the component is an Ordinary or an Additional component.
- CPF Applicable
- NS Pay Applicable
- Pensionable
- SDL Applicable
Click on Submit once you have made all the necessary settings for the component. The component will now be created. 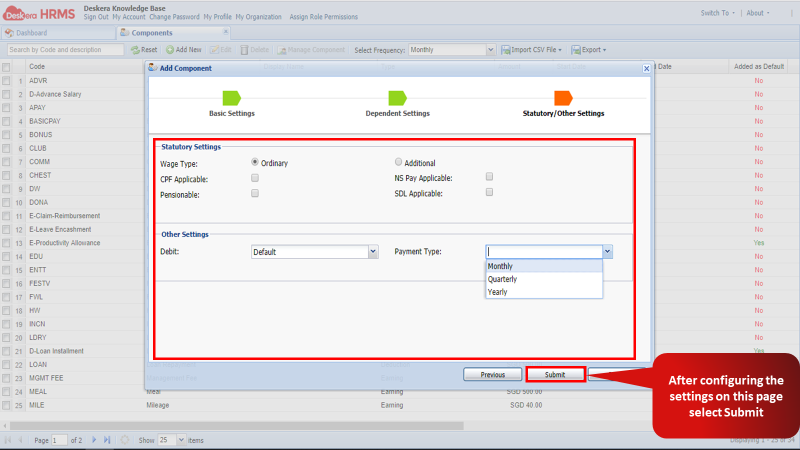 Fig 2.4.5 Statutory/Other Settings
View Components:
In order to view the components, Click on Payroll Components under the Payroll widget in the HRMS Dashboard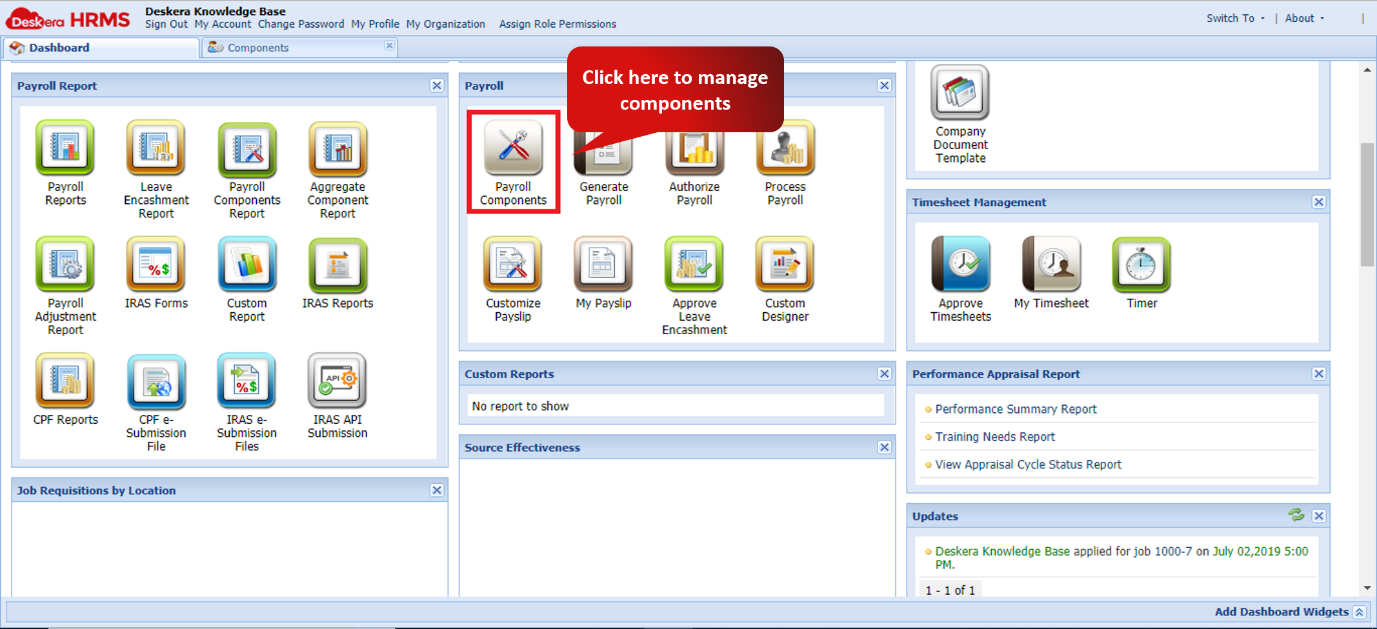 Fig. 2.4.6 HRMS Dashboard
Step 2: You are navigated to a tab containing the list of components, their type and also the amount allotted for each component.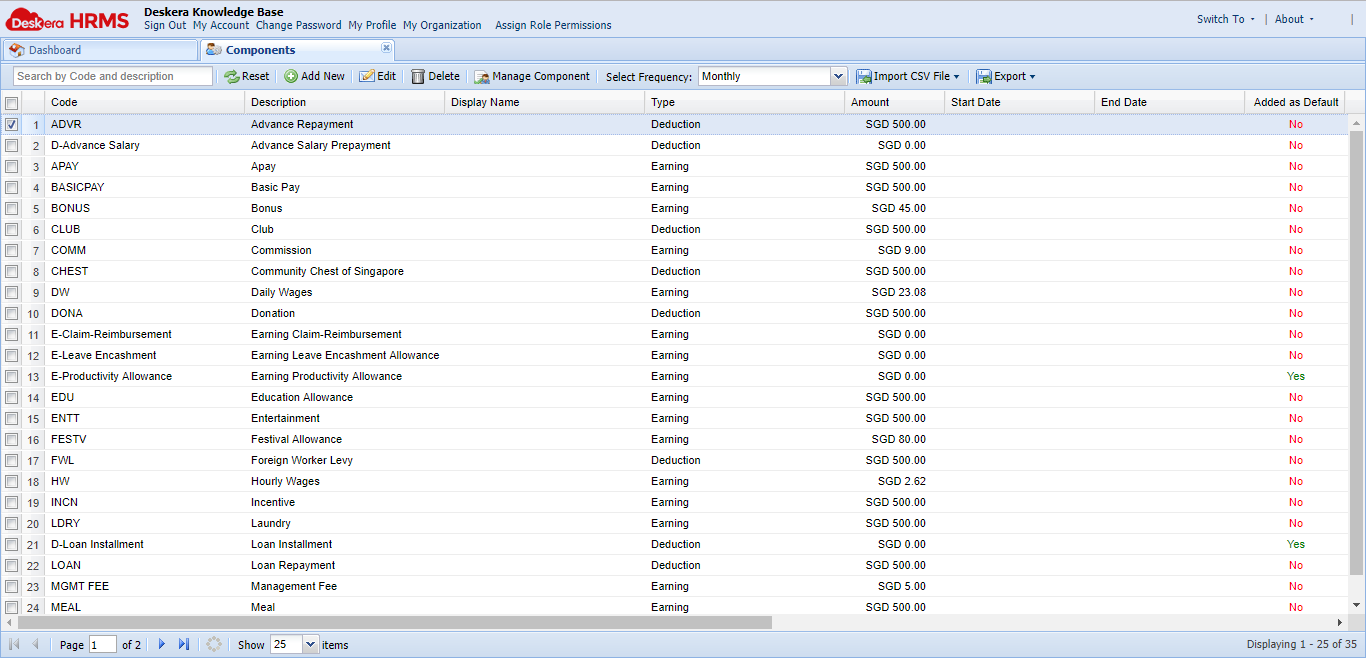 Fig. 2.4.7 Component View
Edit Component:
Step 1: Click on Payroll Components under the Payroll widget in the HRMS Dashboard.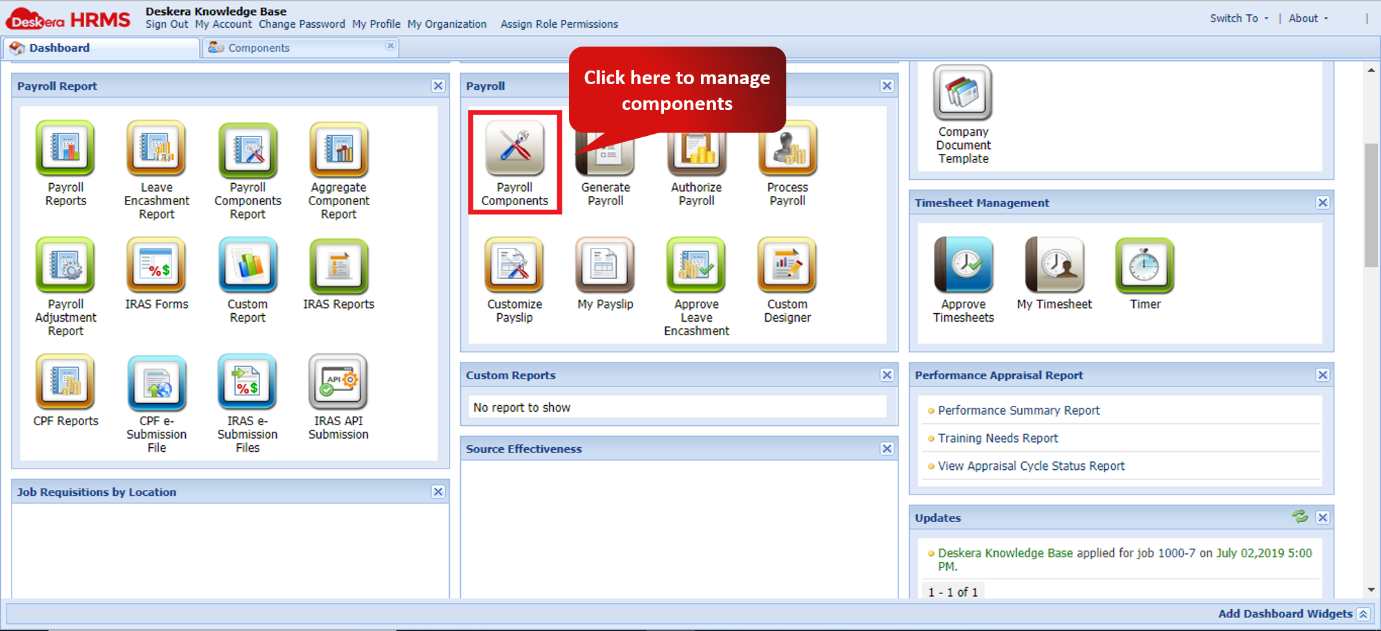 Fig. 2.4.8 HRMS Dashboard
Step 2: Select the component you wish to edit and click on edit to start editing the component.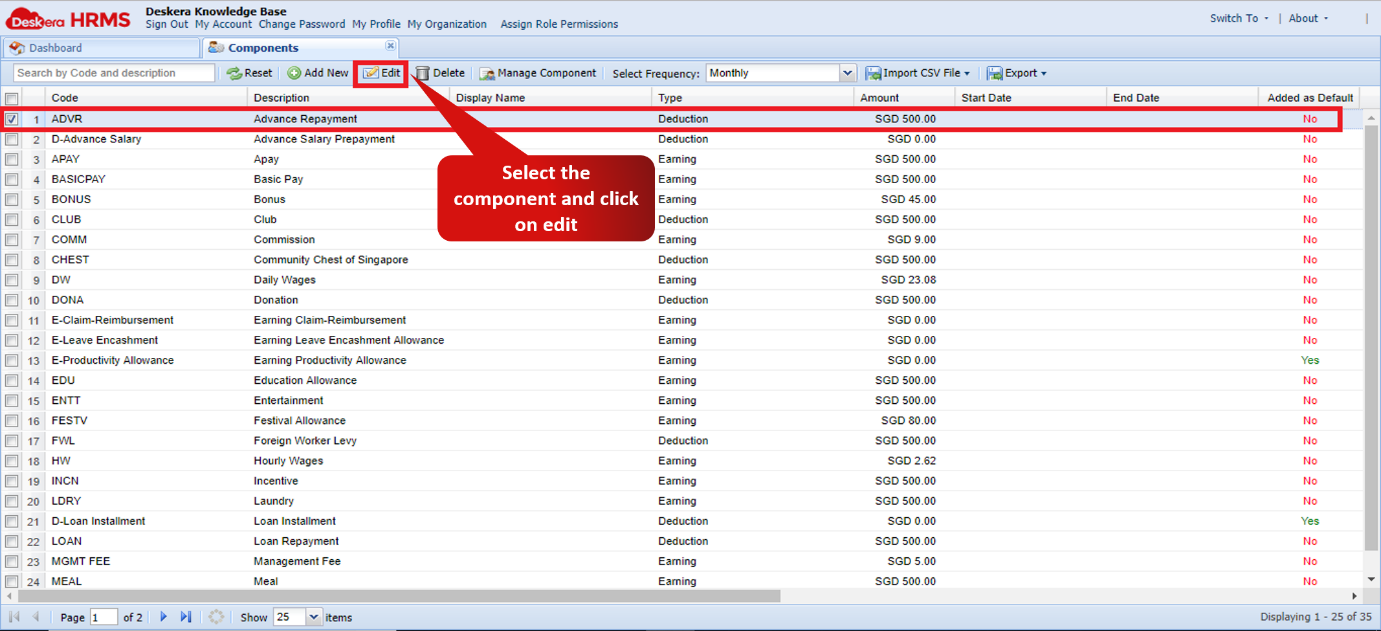 Fig. 2.4.9 Component View
Step 3: Fill in all the required fields and complete the wizard to have successfully edited the component.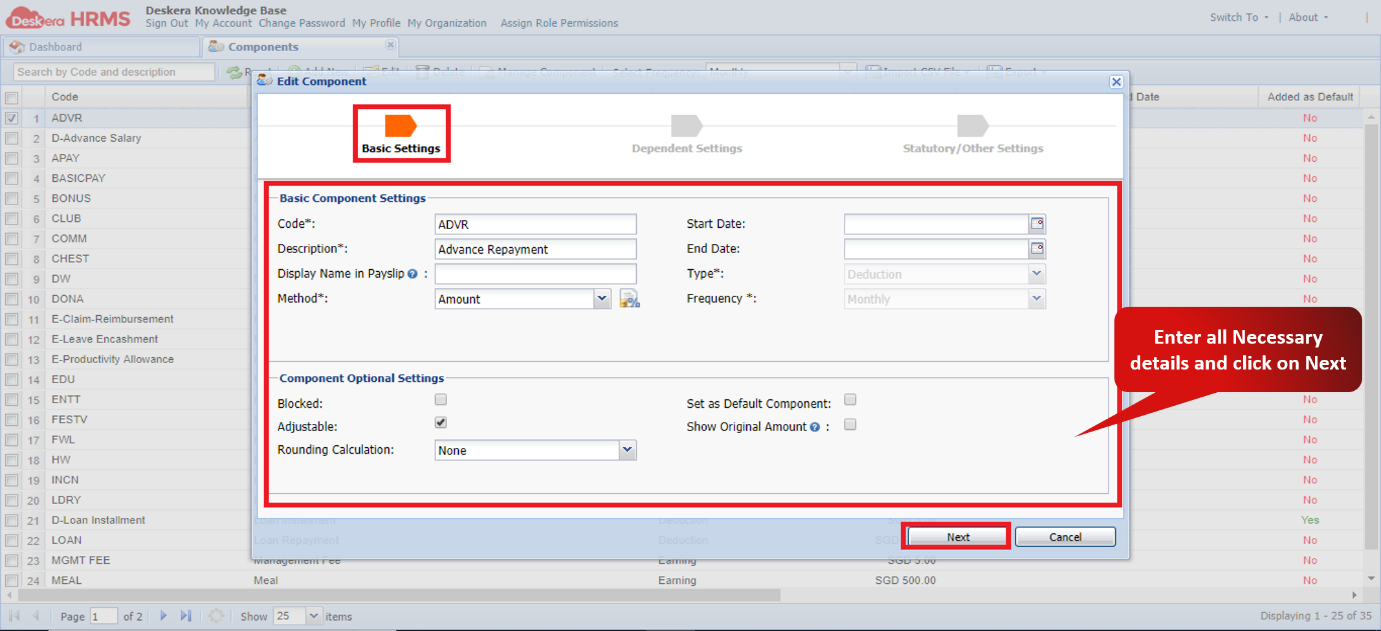 Fig. 2.4.10 Edit Component wizard
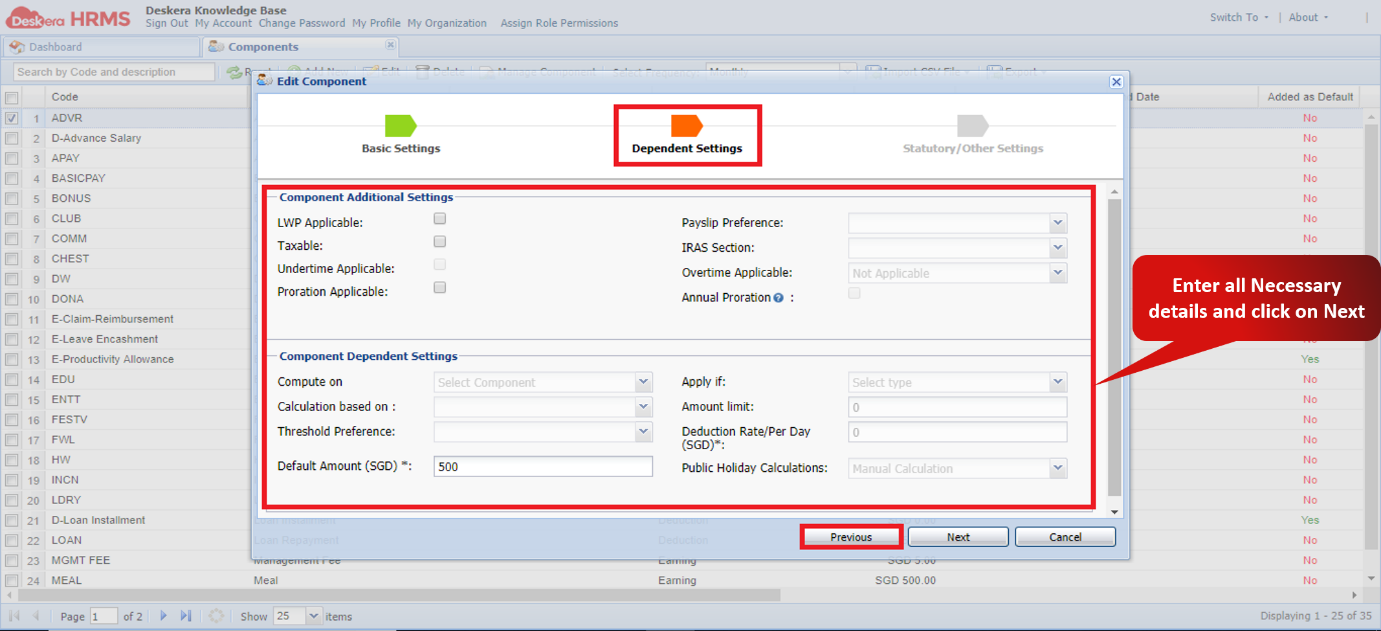 Fig 2.4.11 Edit Component wizard
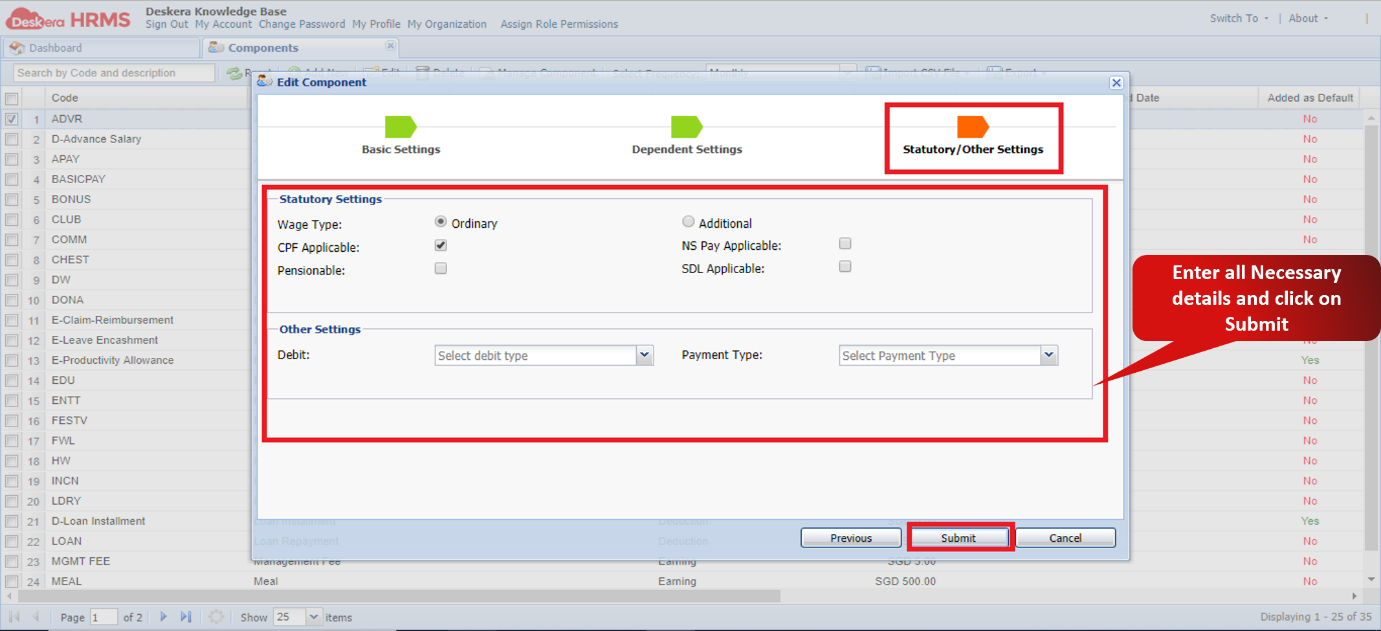 Fig 2.4.13 Edit Component wizard
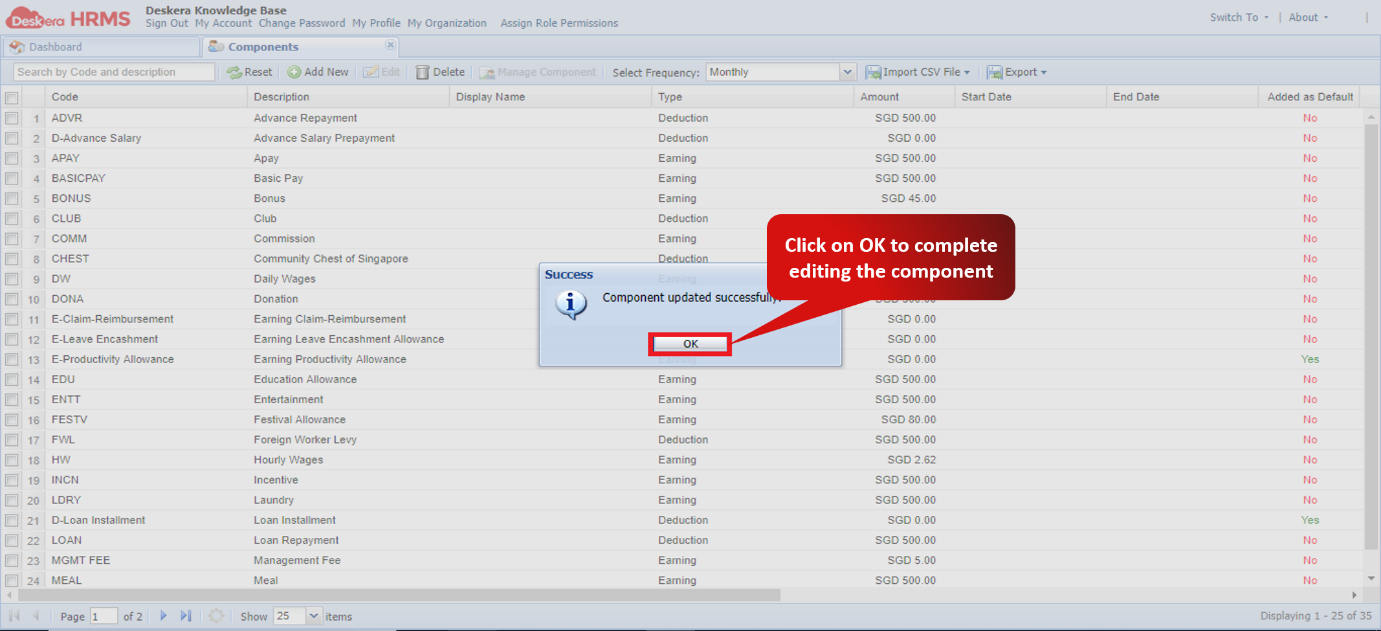 Fig 2.4.14 Confirmation window for editing components
Delete Component:
Step 1: Click on Payroll Components under the Payroll widget in the HRMS Dashboard.Fig 2.4.15 HRMS Dashboard
Step 2: Select the components to be deleted and click on delete.
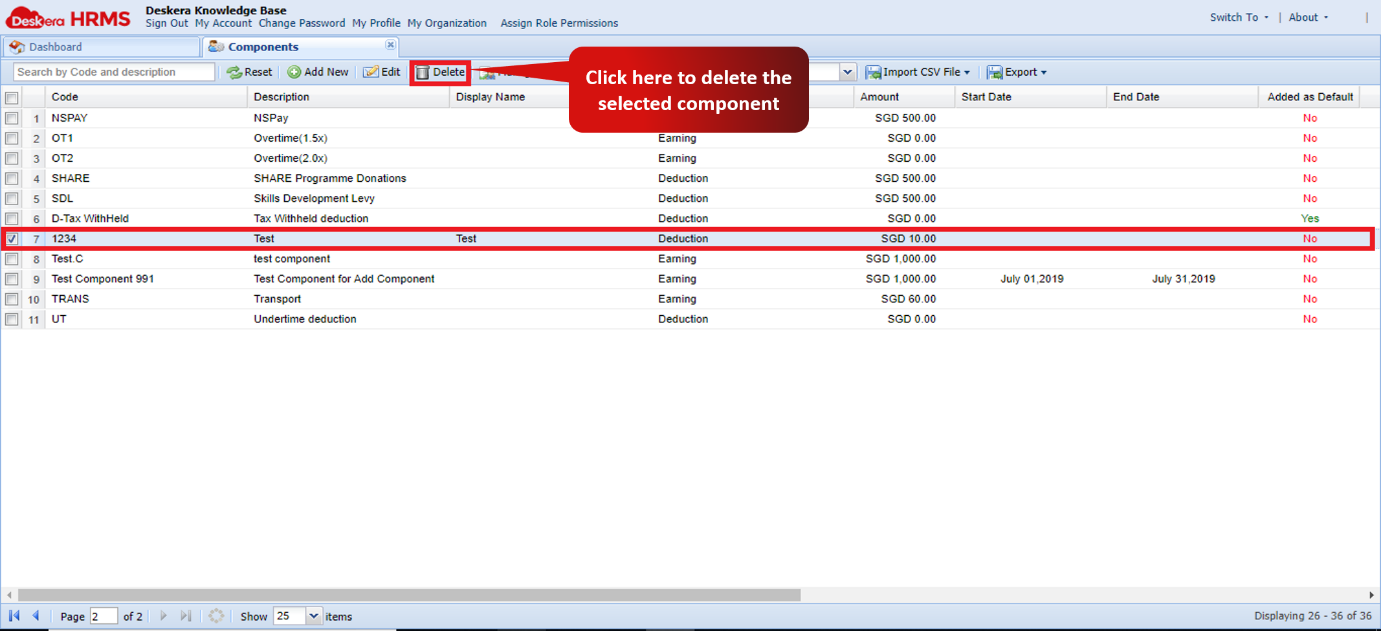 Fig 2.4.16 Component View
Step 3: Click on Yes to confirm deleting the record.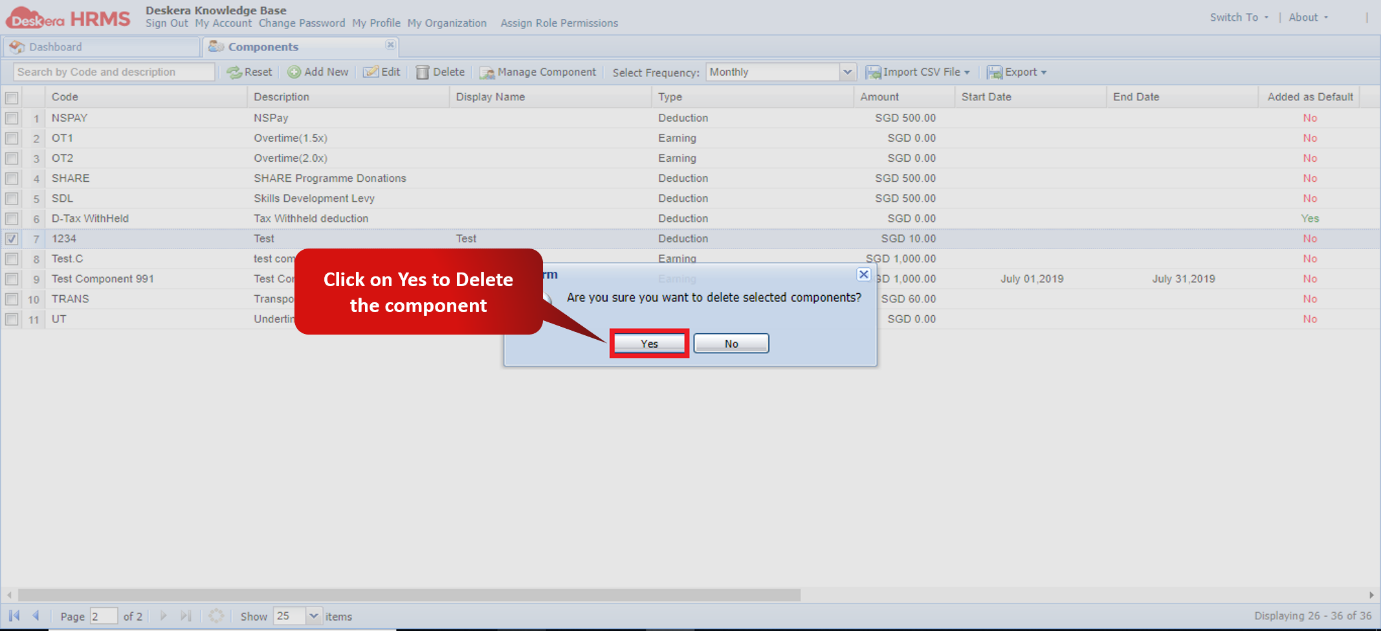 Fig 2.4.17 Confirmation window for deleting components
Generate Payroll
Generate Payroll feature allows you to assign salary components, update employee’s unpaid leaves and calculate the salary of an employee. It is the initial step to process a payroll.\
Step 1: Go to Generate Payroll under Payroll widget in HRMS. 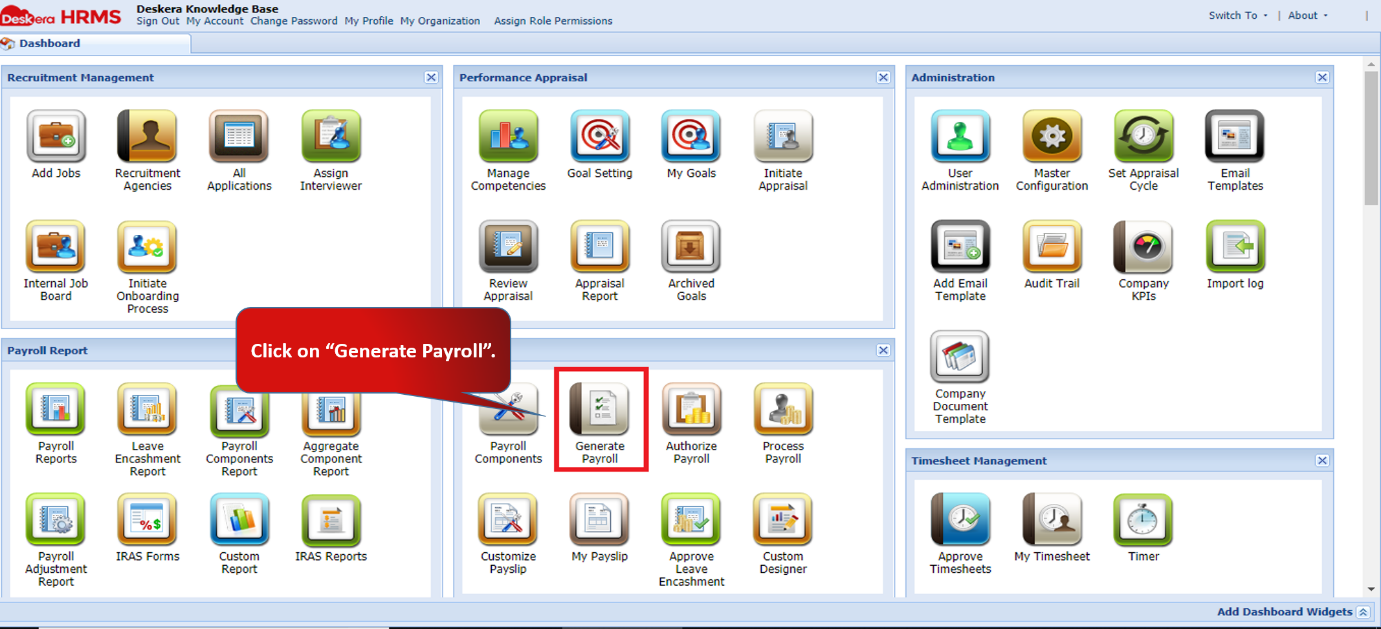 Fig 2.4.18 HRMS Dashboard
Step 2: Generate Salary Process tab is the first step to process a payroll.
Advanced Search feature contains Pay Cycle, Year, Frequency, Period, Start Date, End Date and entry date. Make sure that you have assigned the Pay Cycle to the user in Assign Payroll Settings under User Administration.
Payroll Quick Status gives you an overall summary of payroll processed at various stages. 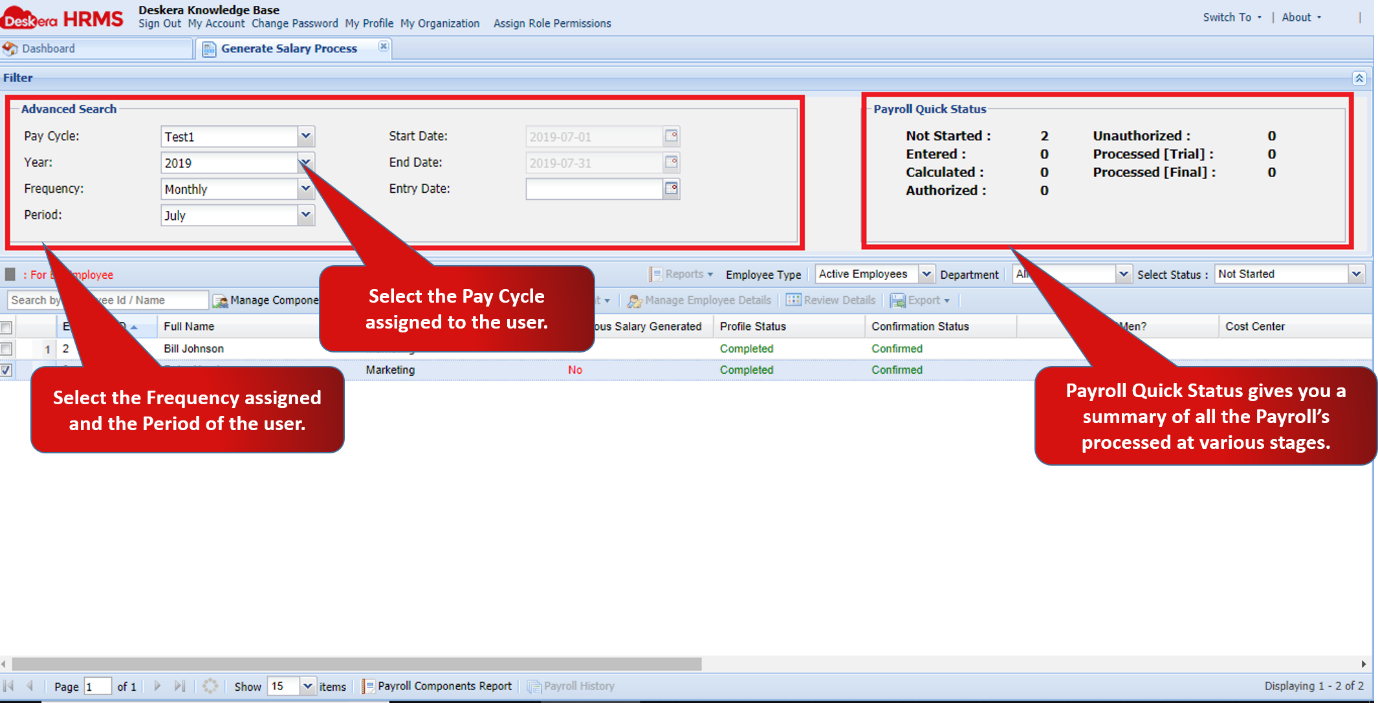 Fig 2.4.19 Generate Payroll
Step 3: Select the user after filling in the details in Advanced Search box. Go to Manage Components and click on Assign Default Components. 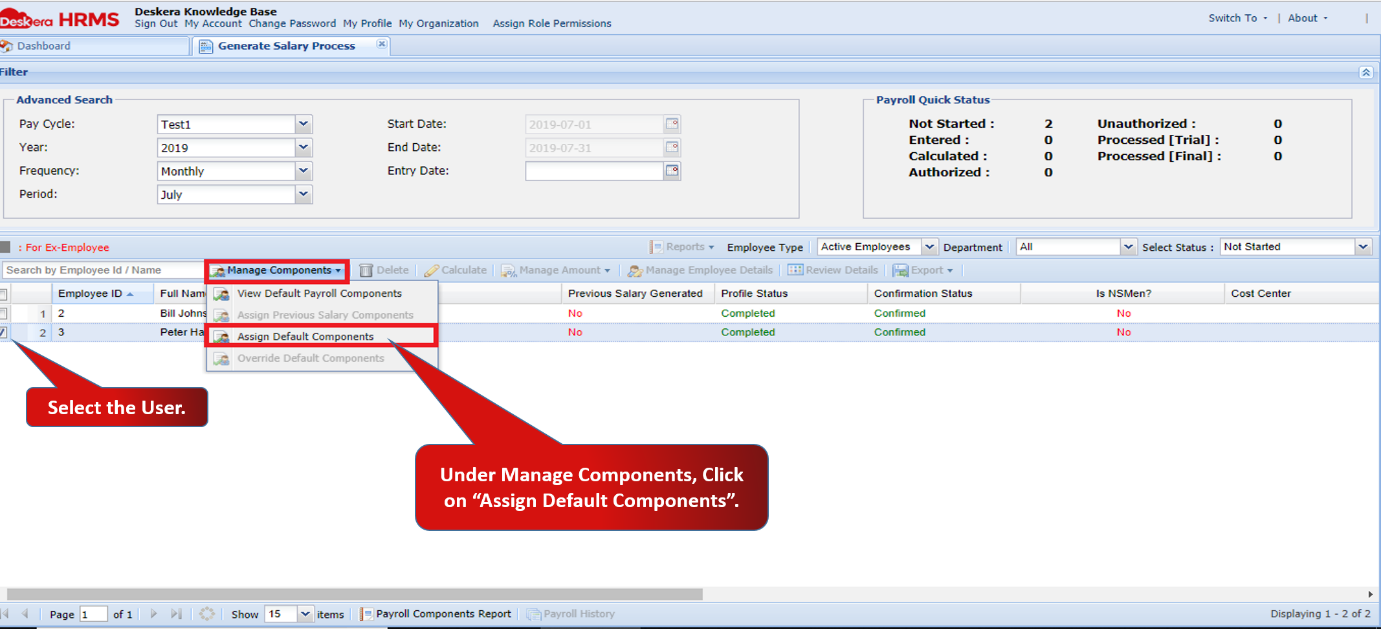 Fig 2.4.20 Generate Payroll
Step 4: A Default Components window will pop up. Select the component on the left you want to assign to the user and click on the arrow to shift it to the right hand side.
You can assign multiple components as well. Once assigned, click on Save.
Components will be assigned successfully. 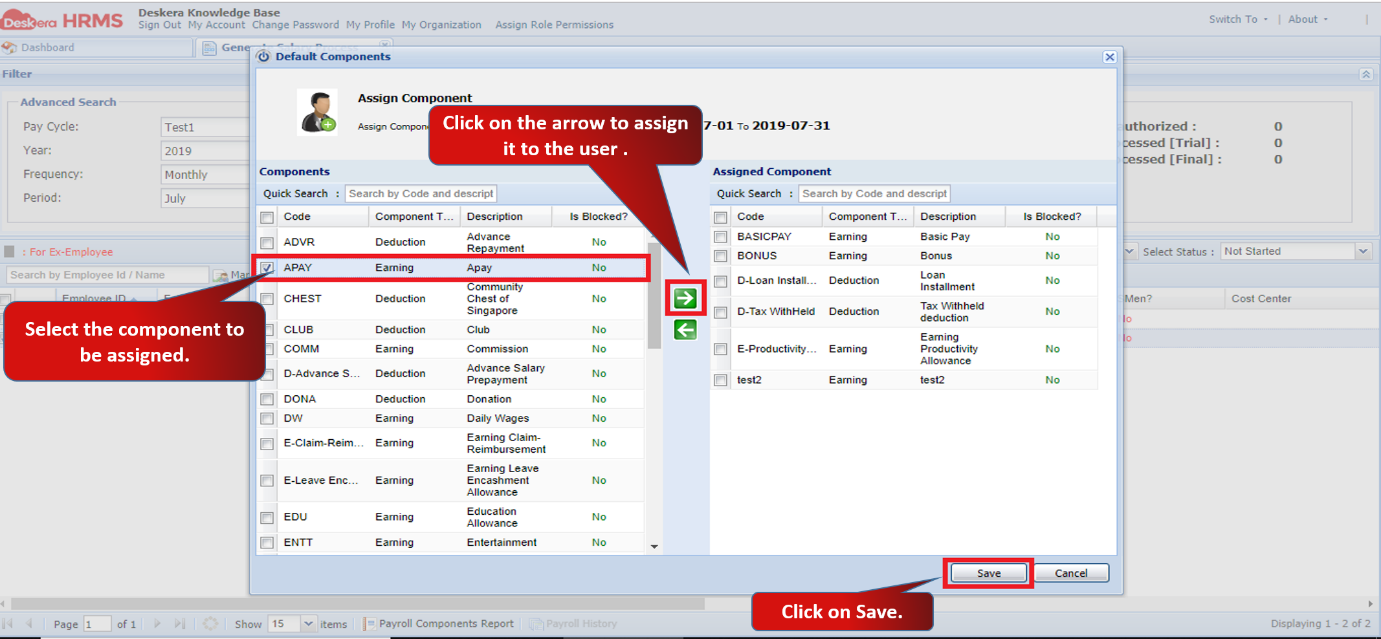 Fig 2.4.21 Assign Components
Step 5: You can proceed to next step once you select the status as “Entered”.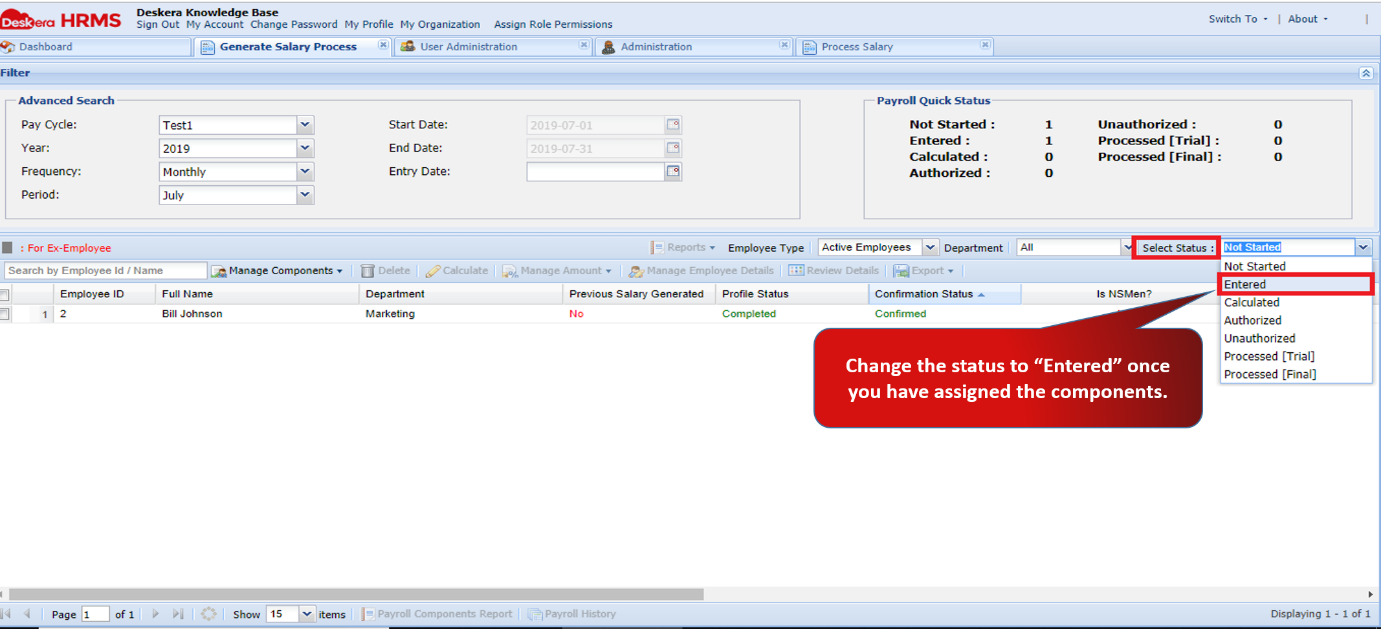 Fig 2.4.22 Generate Payroll
Step 6: Select the user and click on Calculate to calculate the salary according to the assigned components. 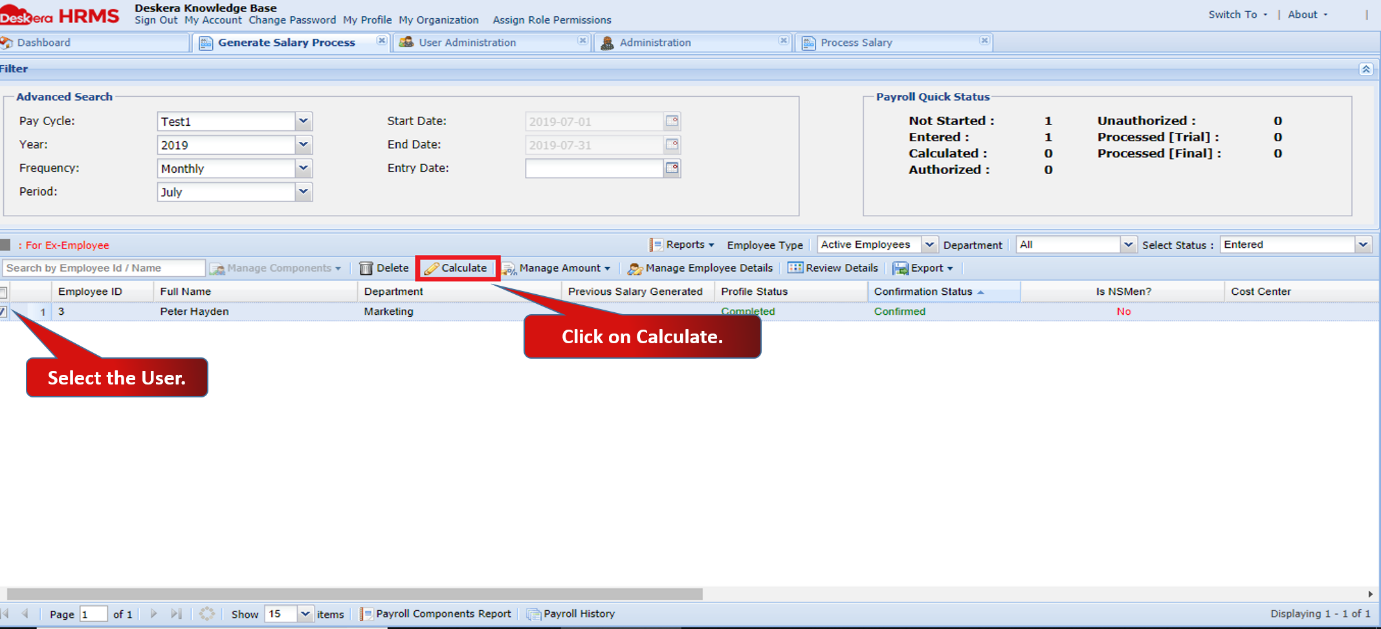 Fig 2.4.23 Generate Payroll
Step 7: Once you click on Calculate, an Unpaid Leaves window will pop up. Fill in the number of unpaid leaves of the user and click on Submit.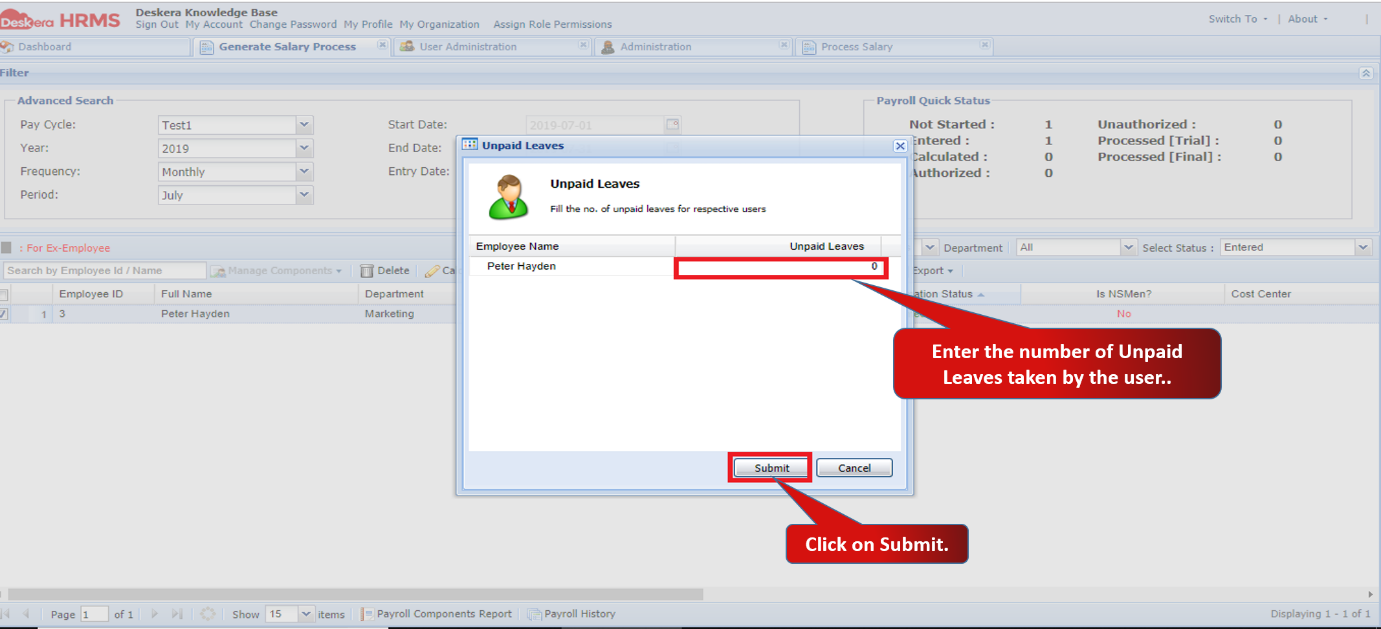 Fig 2.4.24 Generate Payroll
Step 8: You can proceed to next step once you select the status as “Calculated”.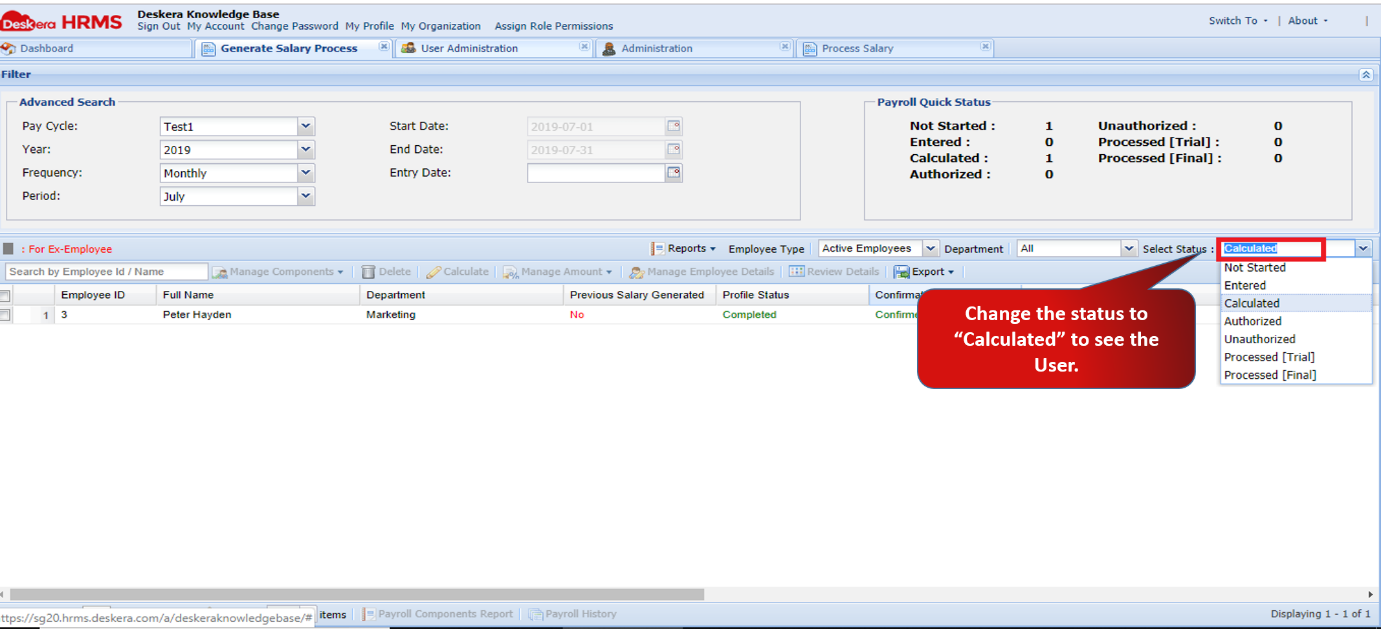 Fig 2.4.25 Generate Payroll
Step 9: Select the user and click on Review Details to see the calculated salary of the user. 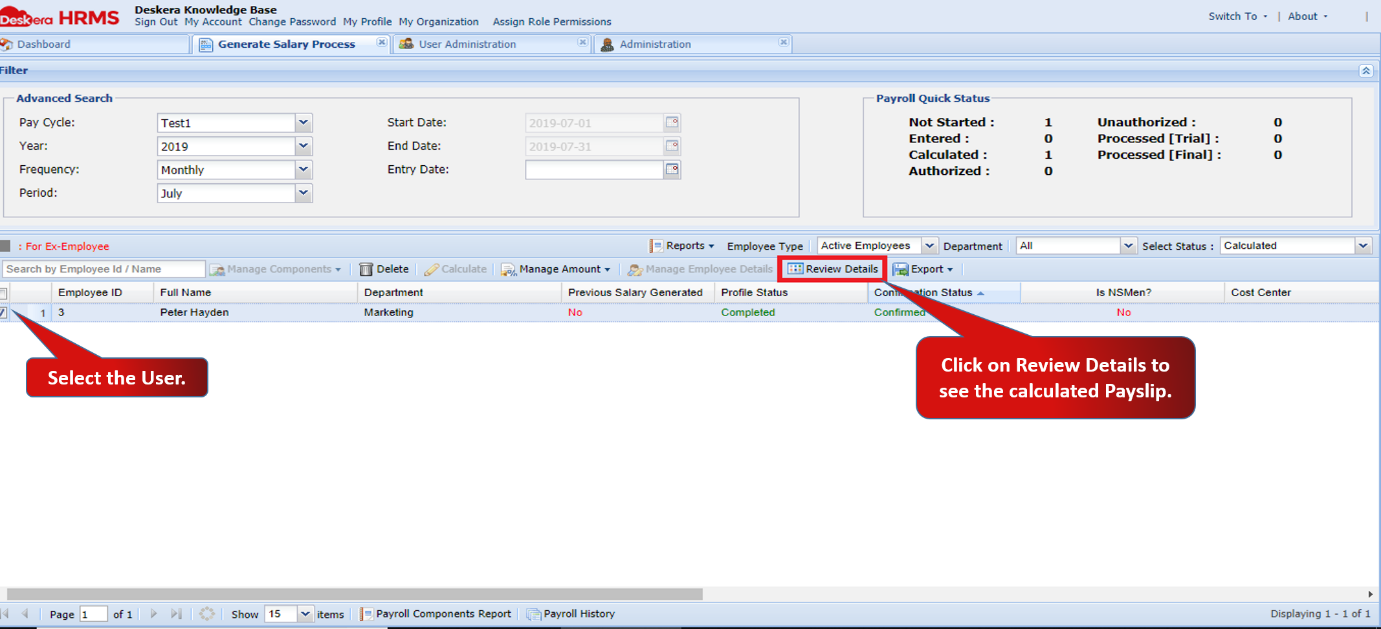 Fig 2.4.26 Generate Payroll
Step 10: Review Details feature allows you to see the user’s Pay Details, current salary status and gross salary of the user. 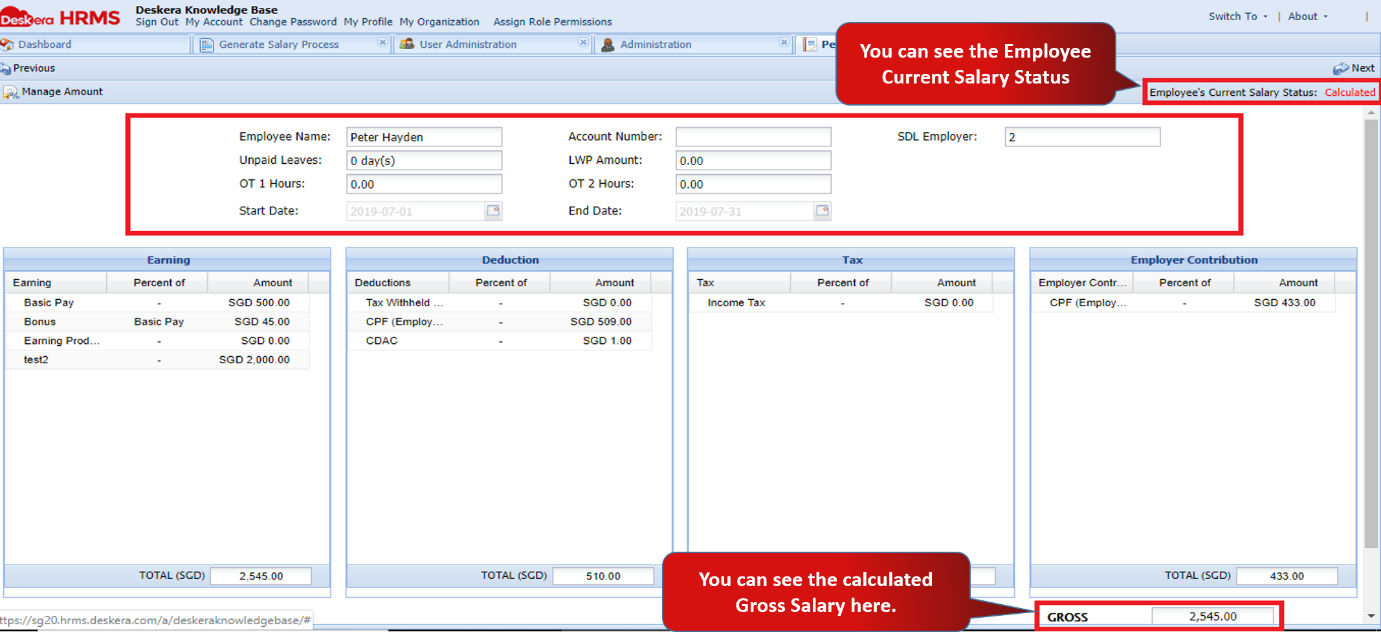 Fig 2.4.27 Generate Payroll
Authorize Payroll
Salary that is generated has to be authorized for further processing. With the help of this function, the administrator can authorize the processed salary for payroll generation.
Step 1: Click Authorize Payroll under Payroll on the Deskera HRMS Dashboard. 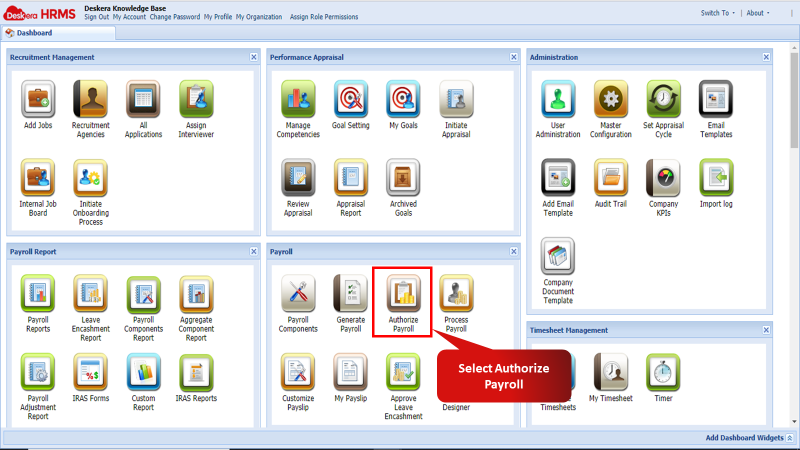 Fig 2.4.28 Authorize Payroll
Step 2: On the Authorize Payroll Process window select the employee whose payroll the user wishes to authorize. Then click the Authorize button. The payroll would now have been authorized. The user will now appear under Process Payroll found on the HRMS Dashboard.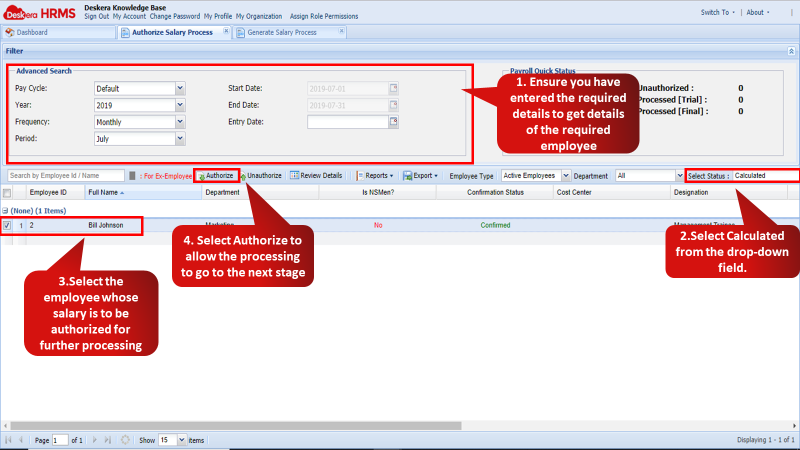 Fig 2.4.29 Authorize Salary Process
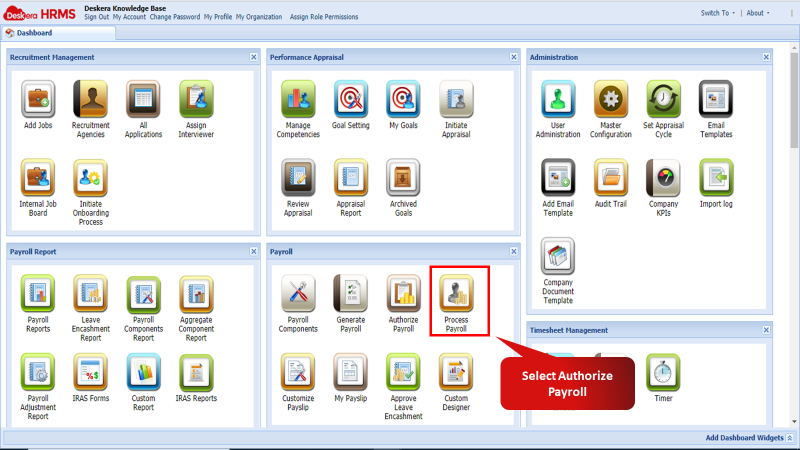 Fig 2.4.30 Process Payroll
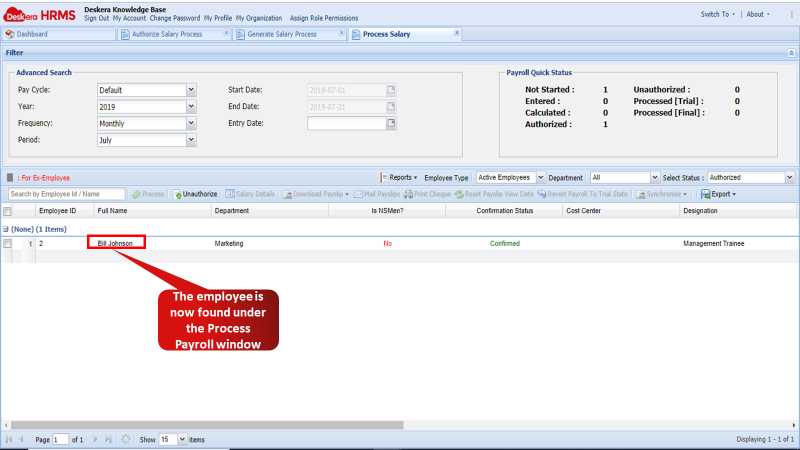 Fig 2.4.31 Process Payroll
Process Payroll- Trial
Process Payroll – Trial feature allows the administrator to process the payroll in trial stage. This feature helps to make changes in the payslip and payroll components before processing the payroll in the final stage.
Step 1: Go to Process Payment under Payroll widget in HRMS. 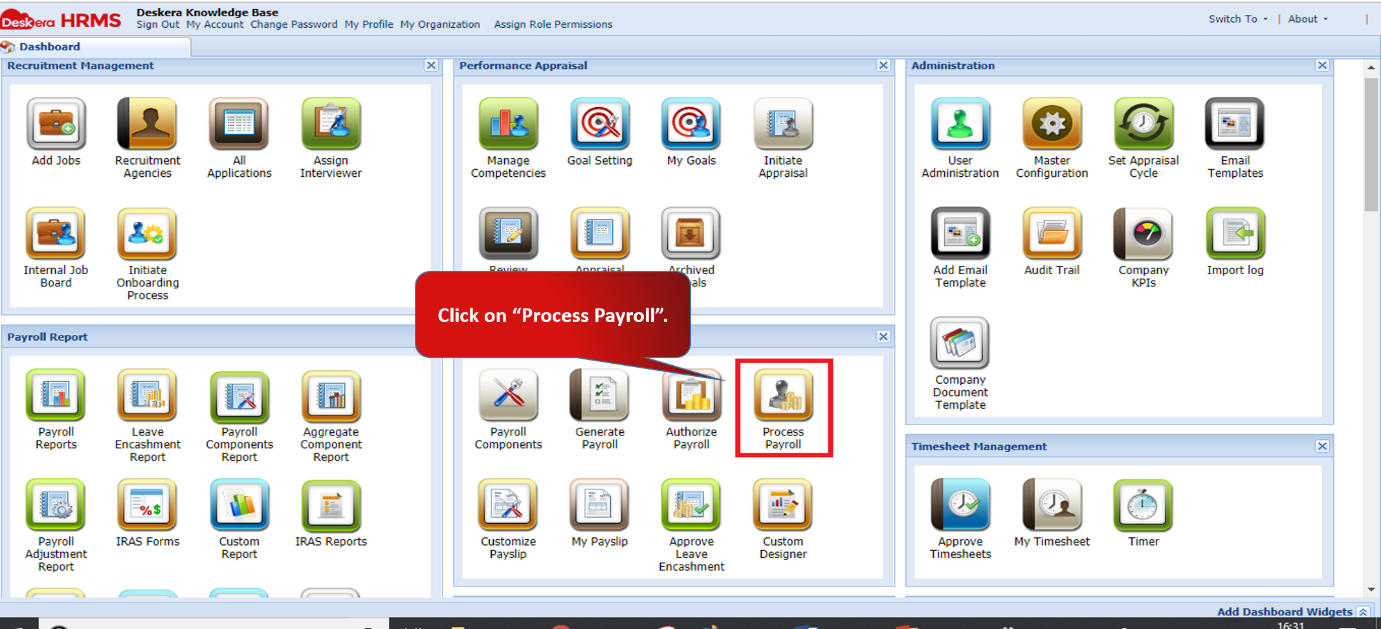 Fig 2.4.32 HRMS Dashboard
Step 2: Ensure that you have entered the details in Advance search including the pay cycle and the frequency of the user whose payroll has been generated and authorized.
Change the Status to Authorized to see the user. 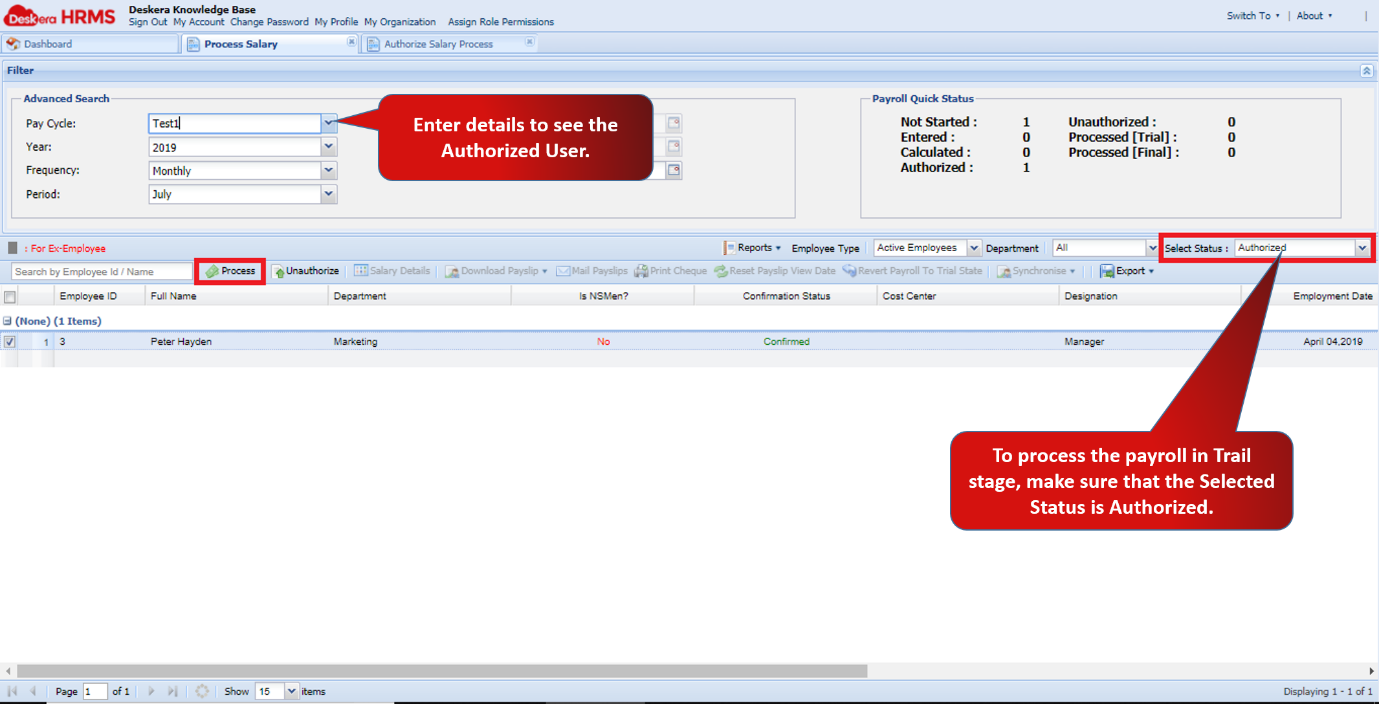 Fig 2.4.33 Process Payroll
Step 3: Once you have selected the User, click on Process. 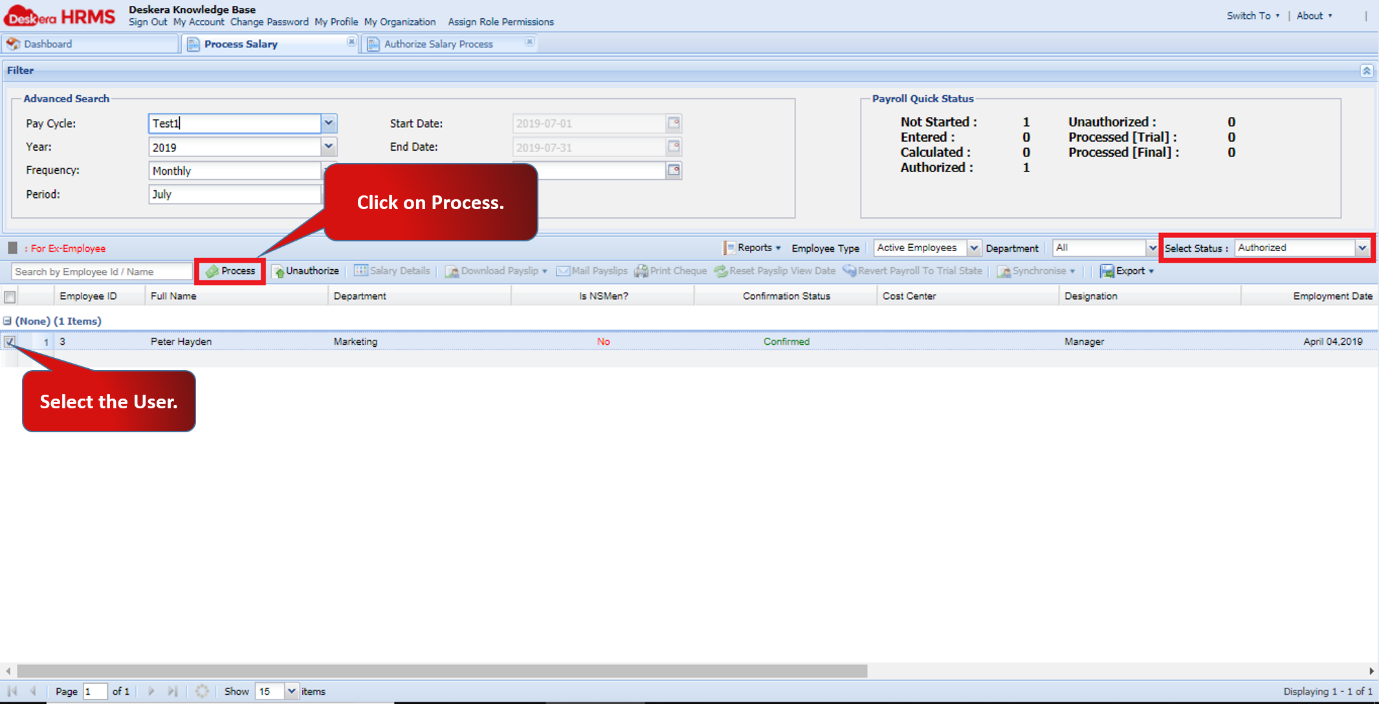 Fig 2.4.34 Process Payroll
Step 4: A Process Payroll window will pop up. Change the Process to Trial.
Fill in all the details and click on OK.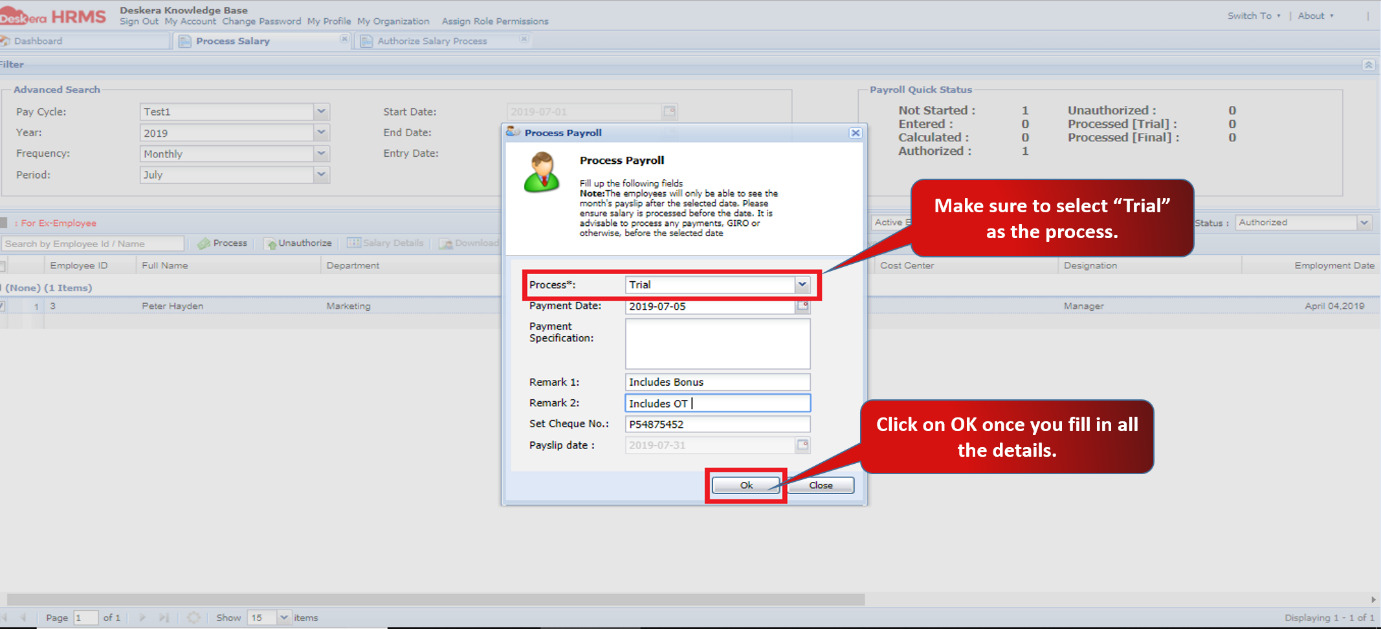 Fig 2.4.35 Process Payroll
Step 5: Change the status to Processed [Trial] to see the user whose payroll has been processed at the trial stage.
Here you can Unauthorize, check Salary Details and Download Payslip as well.
If the payroll has been processed at the Final stage, then you cannot unauthorize it or process it again. 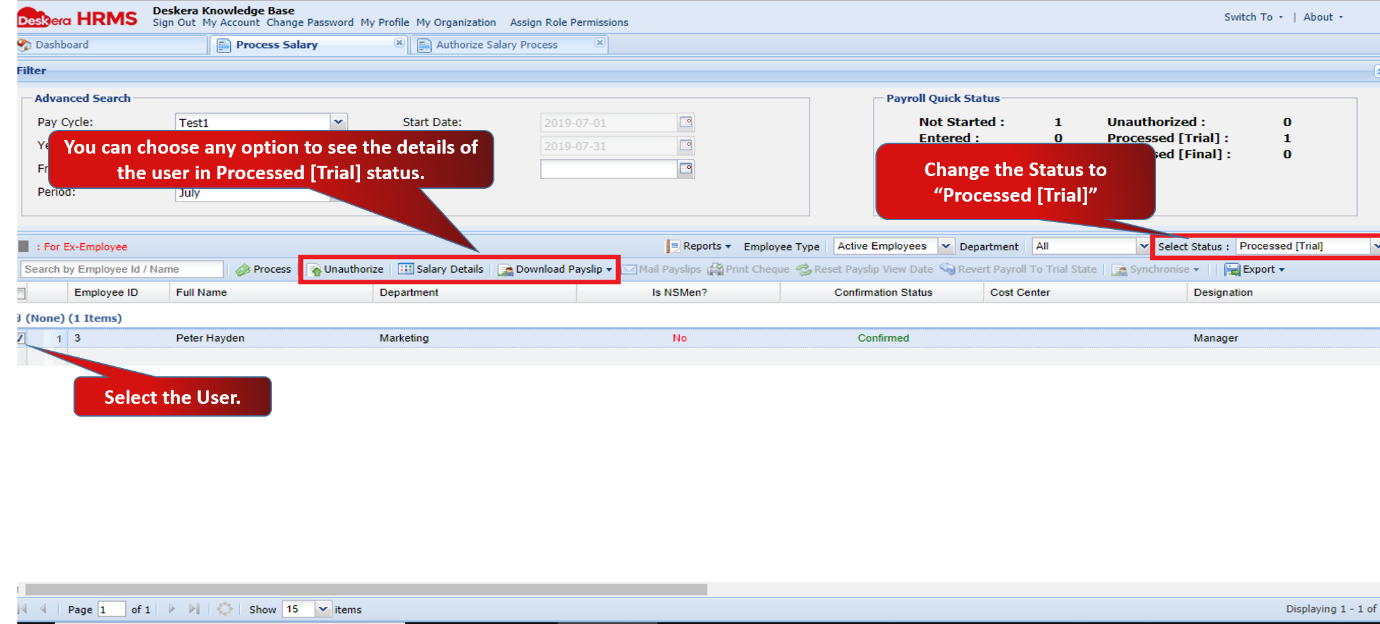 Fig 2.4.36 Process Payroll
Process Payroll- Final
Process Payroll – Final feature allows the administrator to process the payroll in the final stage. This feature helps the administrator to initiate the final step of the Payroll after having gone through all the previous steps.
Step 1: Go to Process Payroll under Payroll widget in HRMS. 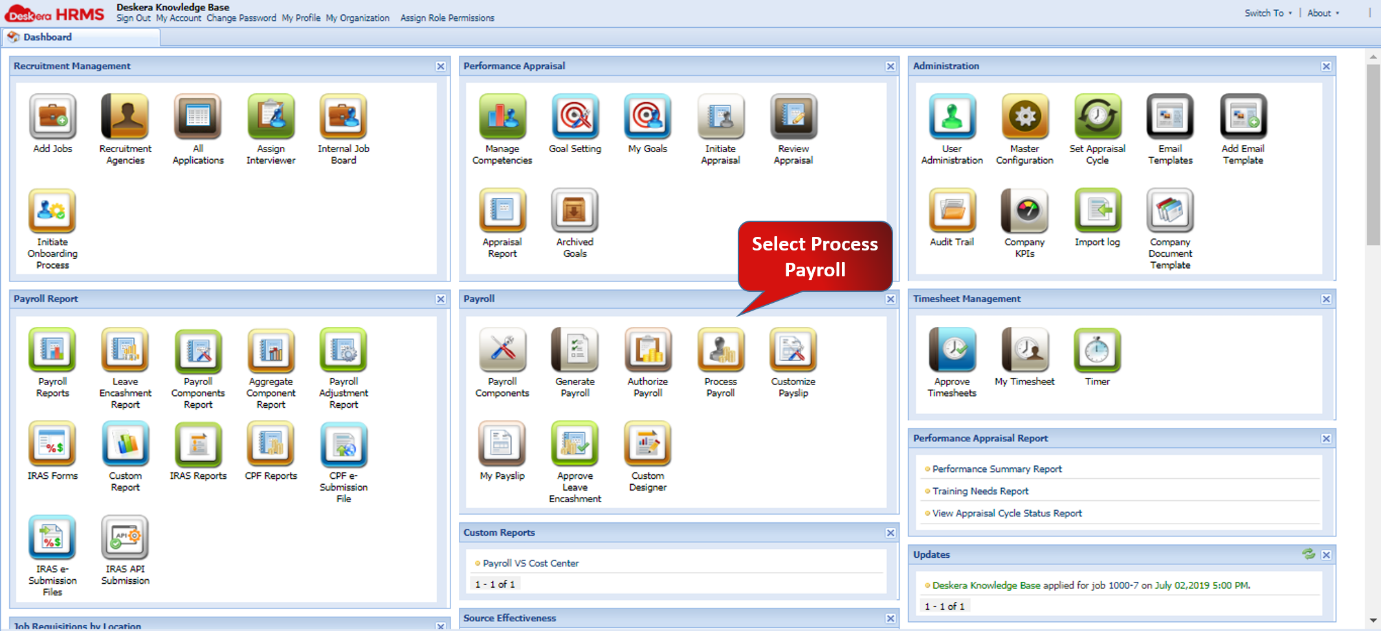 Fig 2.4.37 HRMS Dashboard
Step 2: Ensure that you have entered the details in Advance search including the pay cycle and the frequency of the user whose payroll has been generated and authorized.
Change the Status to Authorized to see the user. 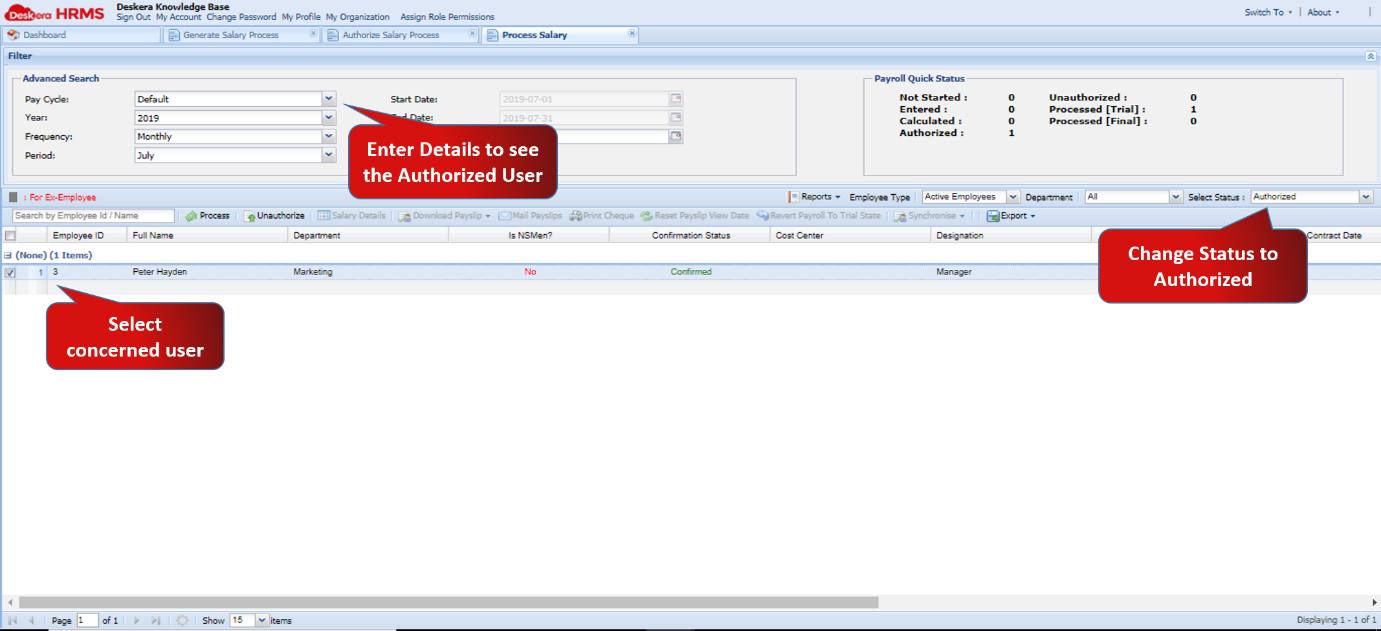 Fig 2.4.38 Process Payroll
Step 3: Once you have selected the User, click on Process. 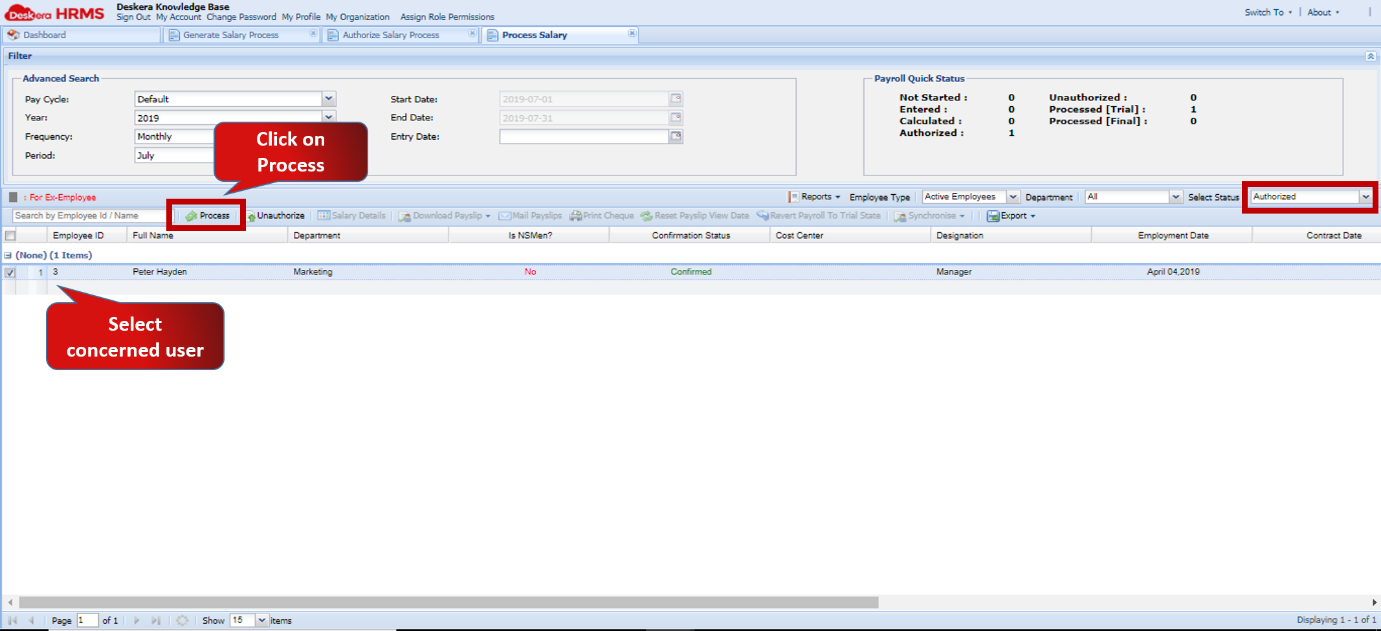 Fig 2.4.39 Process Payroll
Step 4: A Process Payroll window will pop up. Change the Process to Final.
Fill in all the details and click on OK.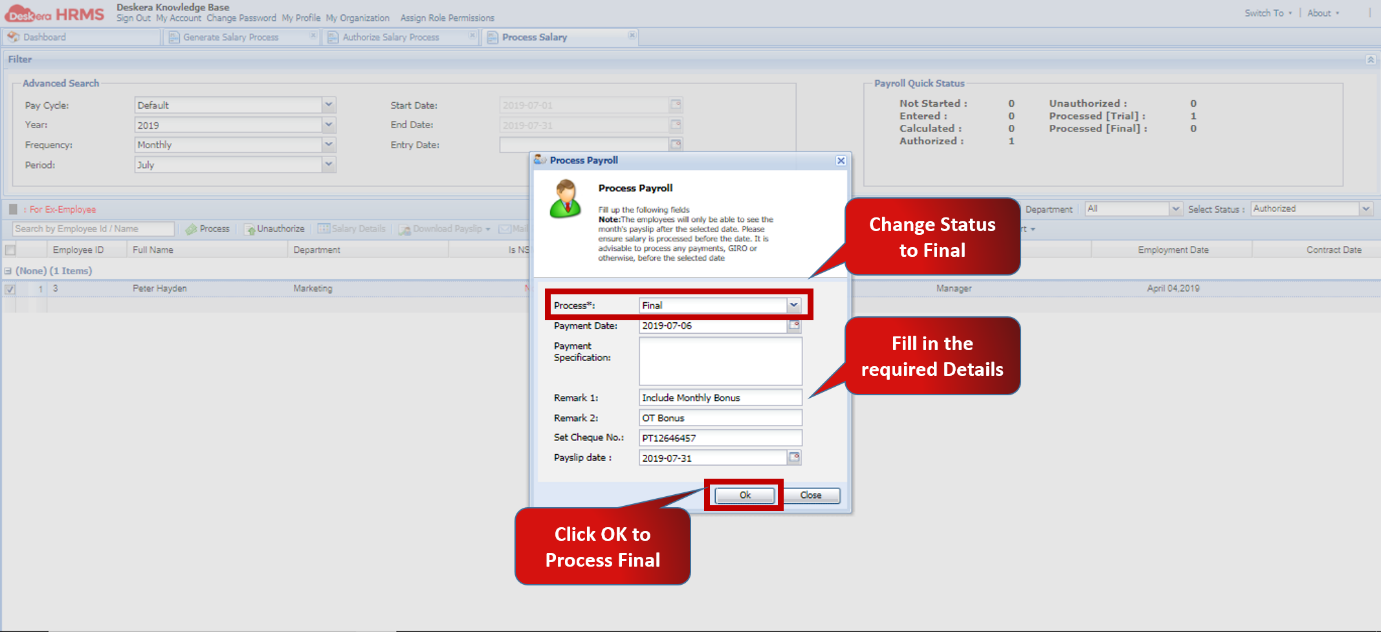 Fig 2.4.40 Process Payroll
Step 5: Change the status to Processed [Final] to see the user whose payroll has been processed at the trial stage. Here you can Review Salary Details, Download Payslip and Revert Payroll to Processed Trial Stage as well.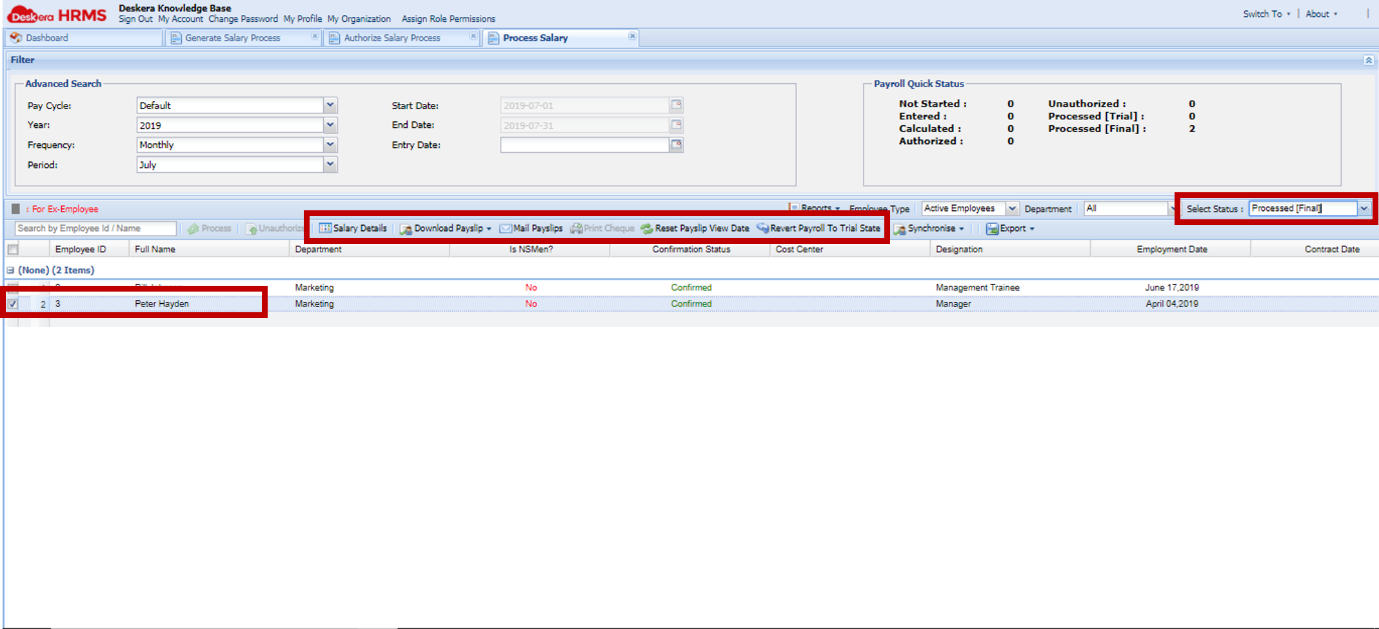 Fig 2.4.41 Process Payroll
Comments
0 comments
Please sign in to leave a comment.