
Deskera eLeave allows the users to generate various types of reports on the data that is generated regarding employee leaves, leave types, shifts, attendance, roster, etc. Deskera eLeave allows the user to create and manage different leave types that can be assigned to the employees. This article focuses on how the user can edit, add or delete leave types on Deskera eLeave.
Prerequisites:
1. Ensure you have your Deskera eLeave application URL in place.
2. Ensure you are logged in as Administrator in eLeave Application.
3. Ensure a good internet connectivity.
Step 1: Go to Manage Leaves Types under Leave Status on eLeave Dashboard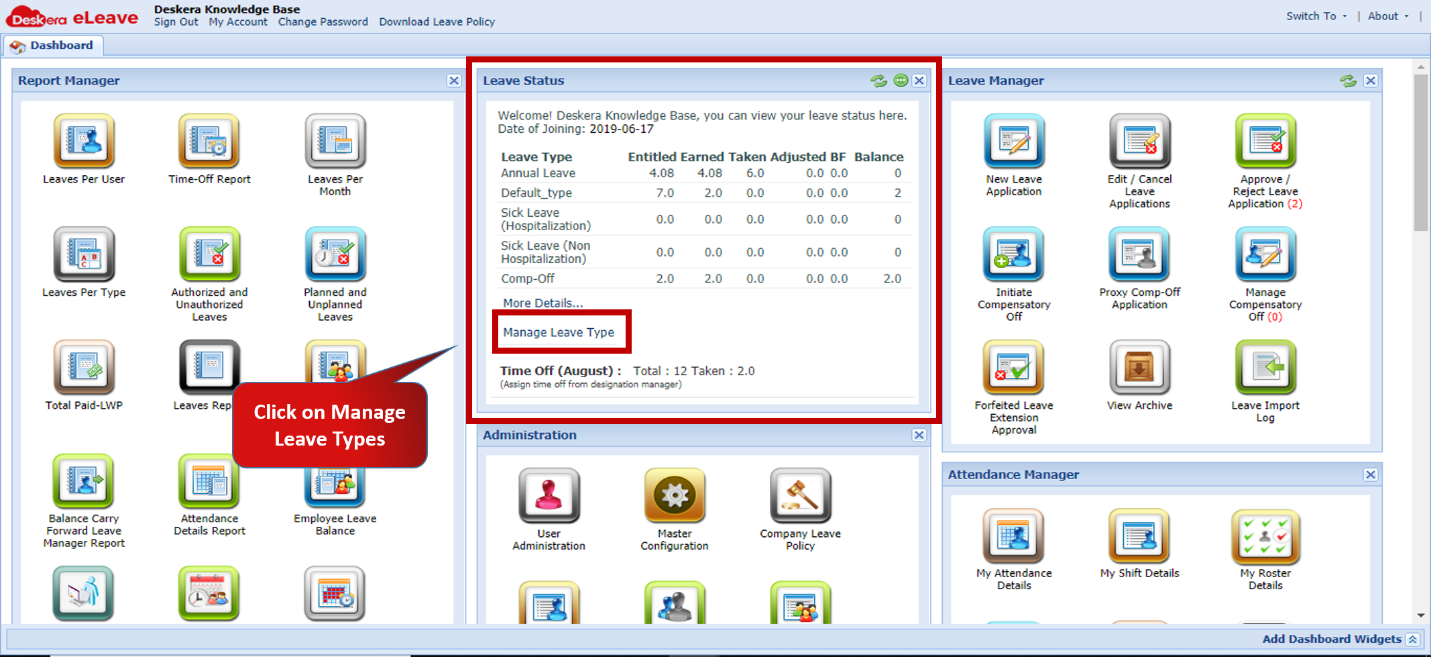 Fig.3.5.2.1 eLeave Dashboard
The following are the various columns detailing the various functionalities of each leave type:
1. Total: Total number of paid leaves to be assigned to user per year.
2. BF/ Year: Maximum number of leaves that can be carried forward per year.
3. Max. Balance: Maximum number of paid leaves that user can take per year.
4. Calculated By:
- Working Days: Calculated excluding intervening holidays (A leave on Friday & Monday will be counted as a 2 day leave).
- Calendar Days–Calculated including intervening holidays (A leave on Friday & Monday will be counted as a 4 day leave since Saturday & Sunday will be included).
5. Accrual:
- Monthly–Leaves accrued monthly in a prorated manner.
- Yearly–Leaves accrued fully at the start of the year.
- Yearly–Special–Leaves accrued monthly in a prorated manner, Balance will be considered as per leave entitlement.
- Ad-hoc–Total leaves accrued as per entitlement
6. Entitlement Basis:
- Default Allocation–Leaves assigned equally to all employees.
- Designation–Leaves based on Designation (Configure using Designation Manager).
- Manual Allocation–Leaves assigned manually to each employee (Assign using the Manual Allocation tab).
- Staggered Allocation–Leaves based on Months of service (Configure from “Leave Configuration” shown in Manage leave types).
- Years of Service–Leaves based on Year of service (Configure using Years of Service Tab in Designation Manager).
7. Leave Policy:
- Company Year DOC– Leave module will work as per company year with employees DOC.
- Company Year DOJ– Leave module will work as per company year with employees DOJ.
- Employee DOC– Leave module will work as per Employee DOC.
- Employee DOJ– Leave module will work as per Employee DOJ.
8. Notice Duration: Number of days before hand employee has to apply for a leave (can be set as negative to allow leave application after availing it).
9. Assign By Gender:
- Male–To Male Employees only.
- Female– To Female Employees only.
- All–Assign to all fulfilling other criteria.
10. Delete: Delete leave type
11. Assign Users: Assign users to leave type.
12. Leave Configuration: Configuration of leave type.
13. Allowed Deduction: Allow deduction for leave type.
14. Active: Check to make active.
15. Document Mandatory: Check to make document mandatory for leave type.
16. Description Mandatory:
17. Allow Unpaid: Check to apply for leave as your leave duration exceeds the leave balance.
18. Allow Proration: Prorate leave entitlement for leave type.
19. Proration Based on Number of Days
20. Encashable Leave Type: Check to make Leave Type as Encashable.
21. Allow NS Pay: Check to allow National Service in Singapore Pay.
22. Consider Half Day as Full Day: Click to consider half days also as full day leaves.
23. Allow to Apply Leave before DOC: Check to enable users to apply for this leave before Confirmation.
24. Months after Joining: Configure the number of months post which leave becomes applicable.
25. Leave Entitlement from Highest YOS: Check to allow leave entitlement based on higher YOS range
26. Leave Consume Parameters: Add leave consumption parameters at time of creating leave type.
Step 2: To Create New Leave Type, Enter Leave Type Details in the last row and Click on Submit
 Fig.3.5.2.2 Manage Leave Types
Step 3: To Edit Leave Types, click on the cell to edit, make the required changes and click on Submit
 Fig.3.5.2.3 Manage Leave Types
Step 4: To Delete Leave Type, select the leave type, scroll right, click on the Delete icon and Submit  Fig.3.5.2.4 Manage Leave Types
Comments
0 comments
Please sign in to leave a comment.